Gamma Correction
We assume here you know what are the gamma correction issues in production. If it is not the case, you can check wikipedia page.
Overview
Guerilla Render is by default, fully gamma correct, i-e, computes everthing in a linear color space. It provides a complete set of tools to control the gamma of the input and output data used in the rendering process and the compositing process.
The Guerilla's user interface is fully gamma correct too. The viewports, the color pickers, the color boxes and the render views display gamma corrected colors, accordingly to the screen's gamma settings.
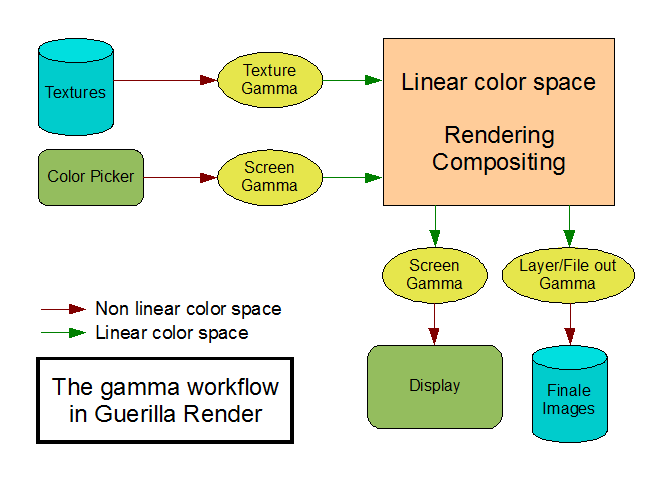
Project's Gamma
Each project has it's own global gamma parameter. This parameter is available in "Preferences > Colors > Project Gamma". The default value is 2.2, which is the gamma of a standard PC monitor. By default, this parameter controls all the other gamma correction parameters, i-e, gamma for the textures, for the file-ins and the file-outs, for the layers and for the screen.
If you already work in a linear workflow (i-e all your inputs/outputs are linears), simply set this parameter to 1.
Screen's Gamma
The gamma of the screen is specified in "Preferences > Local Settings > OpenGL > Screen Gamma". It's a local settings, it means this setting is not saved with the project but in the user configuration file.
You may want to use a specific gamma for the screen. For example, your production is done with a gamma at 2.2, but some monitors have a gamma of 1.8. Change this setting for those monitors.
By default, the screen's gamma uses the project's gamma.
Textures and File-ins Gamma
The textures and the file-ins are supposed to be in the project's gamma space by default. If it is not the case, you can specify a different gamma for each files. For example, the HDRI textures, the bump maps and the displace maps are most of the time in linear space. For those textures, use a gamma of 1.
Layers and File-outs
The output images can also be corrected back in a gamma space before being written in a file. Use the Gamma parameter in the layers or in the fileouts for that. By default, the inverse of the project's gamma is applied to the images before writing them on the disk. Note that those settings have no effect on the user interface (the screen's gamma take care of that), but only on the pixels written on the disk.
If you don't want to apply a gamma to an output float layer for example, use a gamma of 1 on this layer.
Gamma Correction, Alpha and Alpha-Premultiplication
When a image is saved, only the RGB or L channels are Gamma corrected, the Alpha channel is kept as is. RGB or L are Gamma corrected independently of the
Color settings of the Layer, that is, they are corrected the same way should they be premultiplied or not.
Colorfile = Color1/gamma, Alphafile = Alpha (Color is either premultiplied or not)
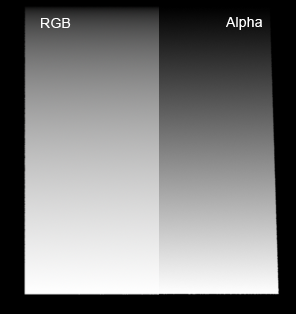
A resulting file at Gamma = 2.2, RGB and Alpha shown.
This might lead to some Alpha blending discrepancies if you composite your images in Gamma (non-linear) space. For instance, a white plane with gradient of Alpha will have a different Luminance and Alpha value in the saved file (that is the Luminance is greater than the Alpha) and will look too bright if composited in the Gamma space, without using correct Gamma correction.
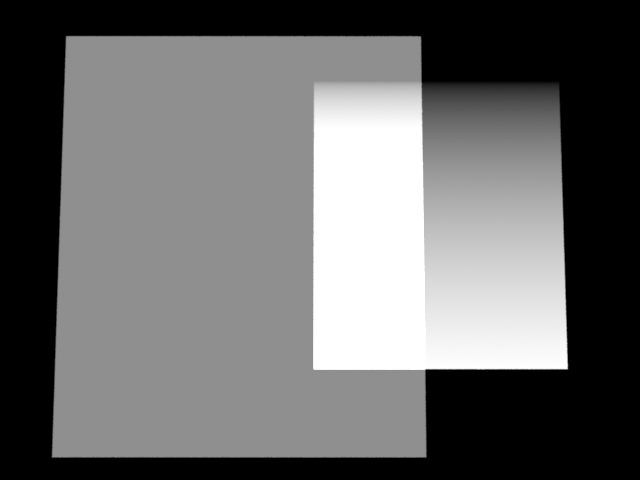
The correct way to composite you images is to linearize them using the correct Gamma setting that was used when saved.
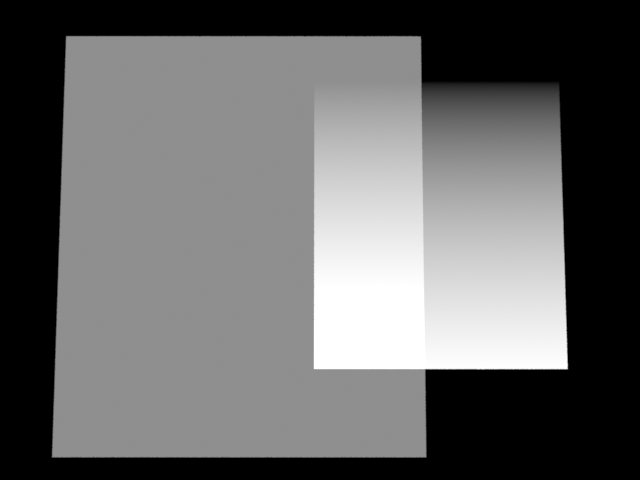
More generally, if you are to use a Gamma corrected pipeline, you have to make sure the Compositing stage is also designed to handle Gamma corrected inputs. Since most compositing operations are only accurate in the linear space, Gamma corrected input images must be linearized prior to blending, color correction. Compositing outputs will then be Gamma corrected depending on your requirements.