AOV
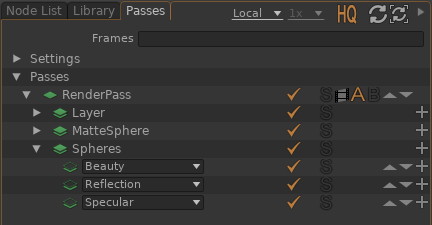
A Layer is split into AOVs (Arbitrary Output Values), which are the actual image rendering units. Each AOV in a RenderPass produces an image at rendering time.
Guerilla comes with default AOV presets covering common use cases, but you can customize them using the Light Path Expression syntax. Skip to the end of this page for interesting light expression examples.

AOVs can render various information, such as the beauty illumination, shading components such as Diffuse, Specular, and also technical images such as the Z depth, normal, ids. Also, AOVs can be filtered by lights, or objects, so it is possible to render the Diffuse component with only a set of light illuminated.
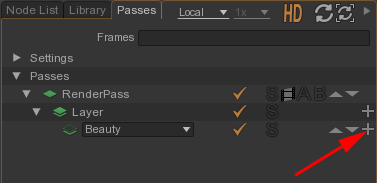
- Press the
 button to add an AOV.

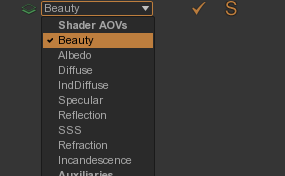
- Select an AOV in the dropdown list. Guerilla comes with many builtins AOVs available in the list which can be customized later.

- Uncheck the first checkbox in the Passes view, on the row corresponding to the AOV.

Alternatively, you can also solo AOVs. In this case, only soloed AOVs are rendered.
- Check the solo checkbox in the Passes view, on the row corresponding to the AOV.

- Select the AOV you want to duplicate.
- Press the
 button to duplicate it.
Some technical AOVs (like Occlusion or Z) use shading nodes in the RenderPass shader. To inspect this shader :
- Drag'n drop the RenderPass in any viewport.

- Inspect and edit the shader.

Render separate shading components
Guerilla can separately render the various shader components, such a diffuse, indirect diffuse, specular, reflections and other passes. In the Render Passes view, click the AOV dropdown to show possible outputs.


Render separate light category
Guerilla can also separate those shader components for every light category. Each light can be assigned to a light category, see Light Attributes > Category. Each AOV can be restricted to a subset of those light categories.
- Use the
Light -> Light Category attribute to specify the category of your lights. - Specify which lights to filter in of the rendering by changing the AOV
Light Categories attribute.
Guerilla comes with default presets of AOVs including light categories, as depicted in the following examples :


Render technical passes
You can also render extra technical passes, such as occlusion, depth, normal, position in camera or world space. Practically, this connects a shading network to the AOV.


AOV Customization
You can customize any AOV in the AOV panel:

- Name: The name of the AOV, also used to name the output file
- Light Categories: List the light categories which will appear in this AOV
- Accept Expression: The Light Path Expression of accepted paths
- Ignore Expression: The Light Path Expression of ignored paths
- Shader Color: The Name of the technical output used, if any
- Set All in Accept Expression
- Set Diffuse in Ignore Expression
- Set All in Accept Expression
- Set Caustics in Ignore Expression
- Set RimLight in Light Category
- Set [Technical] Primary in Accept Expression
- Set Albedo in Shader Color
- Set [Technical] Indirect Singular in Accept Expression
- Set Nworld in Shader Color
If you change the Name of the AOV using the selection menu, these values will be changed accordingly to the new selected preset. You can however manually set a custom name without using the selection menu.
Light Path Expression customization
Accept Expression and Ignore Expression are Light Path Expression. You can select a symbolic name associated with a preset using the selection menu or set your expression manually.
Technical passes customization
Technical passes relies on Accept Expression and Shader Color
Light path expressions
LPE (an acronym for Light Path Expression) is a mechanism that allows to
classify and output selected illumination in a rigorous manner. All previous
examples of AOV setup actually use LPEs. you can find more information in the